Learn How JavaScript Create Element
In this tutorial, you will learn how JavaScript create element with classes and id. You will see how to append these newly created elements at the desired location on the webpage.
One of the most commonly used tasks in web development is to create elements dynamically. This is done by using JavaScript to make websites interactive to the users.
A simple example you can see in a to do list app where you can add, delete and edit to do list items. These list items are created dynamically using JavaScript.
A webpage is interactive when the user is actively engaged with the contents, elements, and functionality of the webpage.
Let's see how you can create an HTML element using javascript and append it anywhere within the webpage.
- Create Element JavaScript
- Appending Element
- Javascript create element with class
- Javascript create element with id
- Javascript create element with attributes
Table of content - JavaScript Create Element
Create Element JavaScript
To create an HTML element using JavaScript use the document.createElement() method.
To create an element you need to pass the element name as an argument to the method.
The document.createElement() method creates the element with the given name and returns it as a Node object.
Syntax:
document.createElement("TagName");The TagName argument is the name of the element you want to create.
- To create a <div> element pass div, DIV, Div, DiV, etc.
- To create a <p> element pass p or P.
- To create a <img> element pass img, IMG, Img, IMg, etc.
Note: The createElement method converts the element name to lowercase and then creates the element. So if you pass DIV as an argument, it will create a div element.
The method also returns the reference to the newly created element which you can store to be used later.
let element = document.createElement("P");Now your element is created and the reference of the element is stored in a variable.
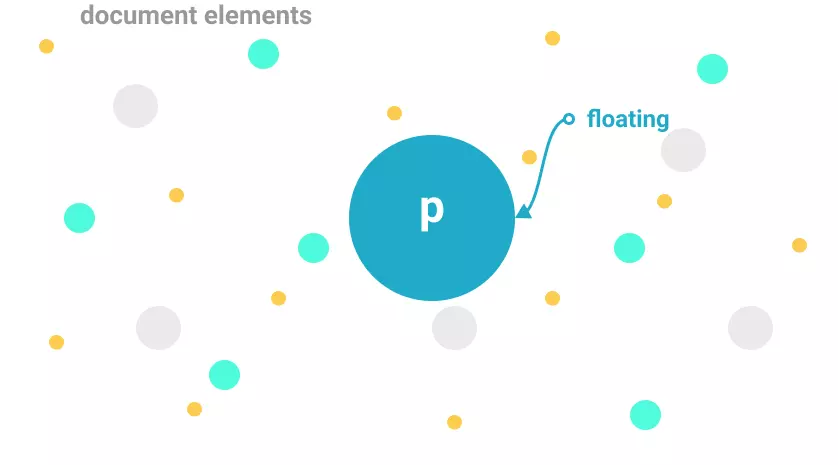
But, this newly created element is floating aimlessly in the document, you have to stitch it to somewhere in the body to be seen or used.
Append Newly Created Element
Just creating an element is not enough to show it on the webpage. You have to append it to somewhere in the body.
The newly created element has no role in the document and is not visible to the user because it is not part of the DOM yet.
There are 3 methods to append an element to the webpage:
- append() method
- appendChild() method
- insertBefore() method
1. append() Method
The append() method appends the element to the end of the parent element.
The method is called upon the parent element and takes the child element as an argument and appends it as the last child of the parent element.
For example in the given example, the <div> is parent element and the <p> is the child element. If you add another <p> element, it will be appended as the last child of the <div> element.
<div id="parent">
  <p>Paragraph 1</p>
  <p>Paragraph 2</p>
</div>
Using the append() method:
let element = document.createElement("P");
element.innerHTML = "Paragraph 3";

// Append the element to the parent element
document.getElementById("parent").append(element);
The final look of the DOM after the above code is:
<div id="parent">
  <p>Paragraph 1</p>
  <p>Paragraph 2</p>
  <p>Paragraph 3</p>
</div>2. appendChild() Method
The appendChild() method is the same as the append() method it appends the element to the end of the parent element.
Although there are few differences between the append() and appendChild() methods:
| append() | appendChild() |
|---|---|
| Using the append() method you can append both DOMString and DOMNodes (element) to the parent element. | Using the appendChild() method you can append only DOMNodes (element) to the parent element. |
| The append() method returns the appended node. | The appendChild() method returns nothing. |
| The append() method can append multiple elements at once. | The appendChild() method can only append one element at a time. |
Here is an example using the appendChild() method:
Example
// selecting parent element
var parent = document.getElementById('parent');

var child = document.createElement('p');
child.innerHTML = 'Paragraph 3';

parent.appendChild(child);3. insertBefore() Method
The insertBefore() method inserts the element before the reference element and makes it the previous sibling of the reference element.
The method is called upon the parent element and operations of inserting the element are performed on its child nodes.
If the node already exists in the parent element, it will be moved to the new position.
Example
// selecting parent
var parent = document.getElementById('parent');
// selecting sibling element
var sibling = document.getElementById('para1');

var element = document.createElement('p');
element.innerHTML = 'Paragraph 3';
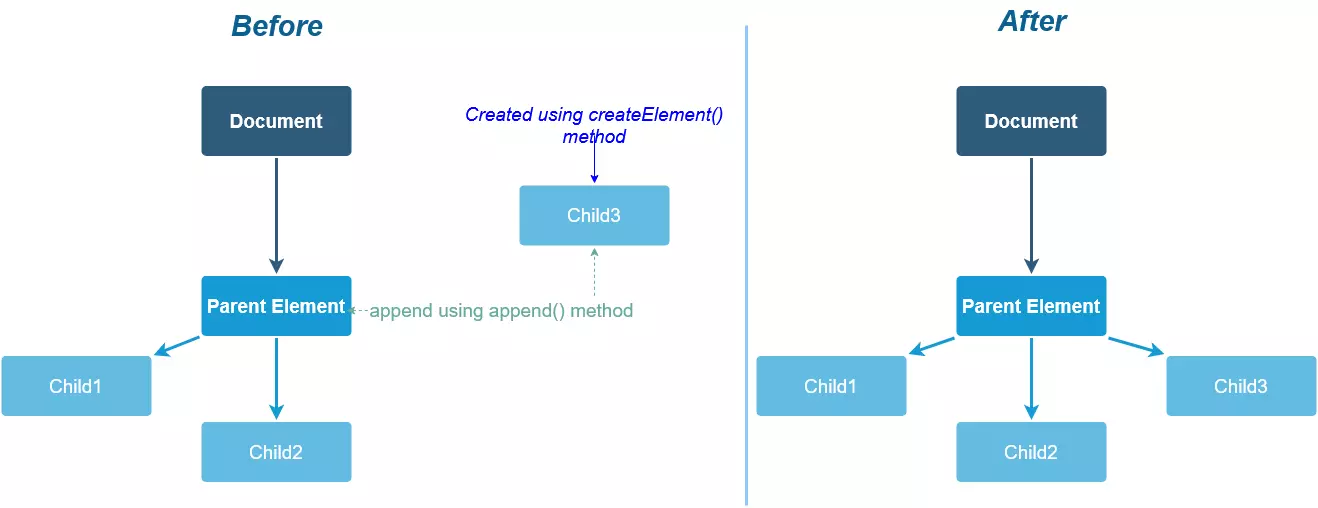
parent.insertBefore(element, sibling);Here is how DOM looks before and after appending a new element.
Javascript Create Element with Class
To create an element with a class, you need to add the class attribute to the element after creating it.
To add a class to an element, you can use the classList.add() method on the element.
Learn more ways of how Javascript add class to an element.
Example
var parentElement = document.body;

// creating new element
var element = document.createElement("P");
element.innerHTML = "New paragraph with 'box' class.";

// adding class to the element
element.classList.add("box");

parentElement.appendChild(element);Javascript Create element with id
The id property of an element is used to get and set the id of an element.
To create an element with an id use createElement to create an element and assign an id to element.id.
In the example below whenever the button is clicked it create an element and add a unique id to it.
Example
<button onclick="createAndAppend()">Create element and add unique id</button>

<script>
  var count = 1;
  function createAndAppend() {
    let parentElement = document.body;

    // creating new element
    let element = document.createElement("P");
    // adding id to the element
    element.id = "id" + count;

    element.innerHTML = "New paragraph with id = " + element.id;
    parentElement.appendChild(element);
    count++;
  }
</script>Javascript Create element with attributes
HTML elements can have attributes. Attributes are used to add extra information to an element.
To add an attribute to an element, you can use the setAttribute() method on the element.
Elements like <input> and <img> have some compulsory attributes like type and src.
To add an attribute to an element, use the setAttribute() method on the element and pass the attribute name and value as arguments.
Here is an example that creates an image element and adds a few attributes to it.
Example
let parentElement = document.body;
// creating new element
let element = document.createElement("IMG");

// adding attributes to the element
element.setAttribute("src", "https://i.imgur.com/Rnj7kZj.jpeg");
element.setAttribute("alt", "picture of pluto");
element.setAttribute("title", "picture of pluto");

parentElement.appendChild(element);Conclusion
You have seen how Javascript create element. Here is a quick summary:
- Create element using
document.createElement()method. - Add class to an element using
element.classList.add()method. - Add id to an element using
element.id = "id" + count;. - Add attribute to an element using
element.setAttribute()method. - Append element to parent element using
append(),appendChild(), orinsertBefore()method.