Student Registration Form in HTML with CSS
As a student, you would have filled out many registration forms for exams, universities, courses, etc. In this tutorial, you will learn how to create a student registration form in HTML with CSS.
1. Student Registration Form
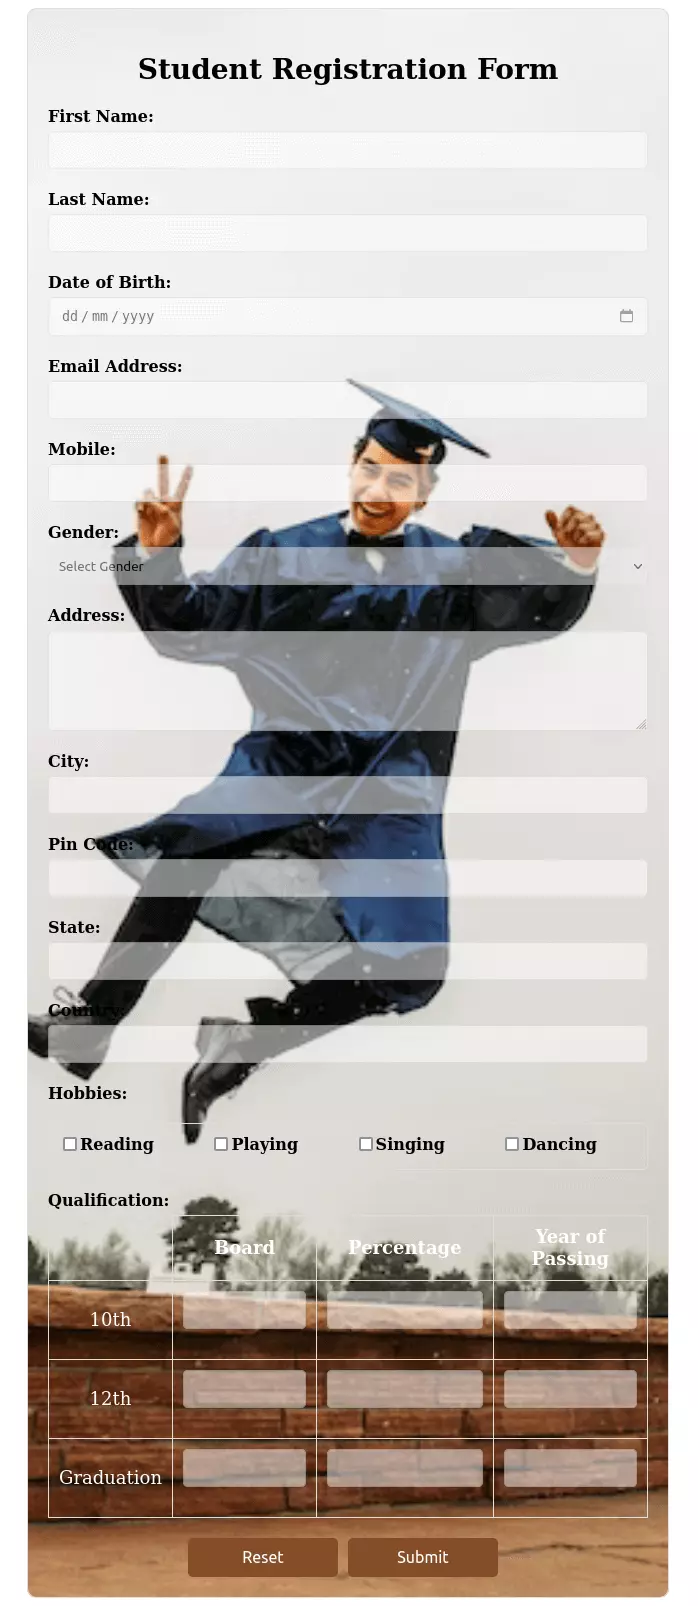
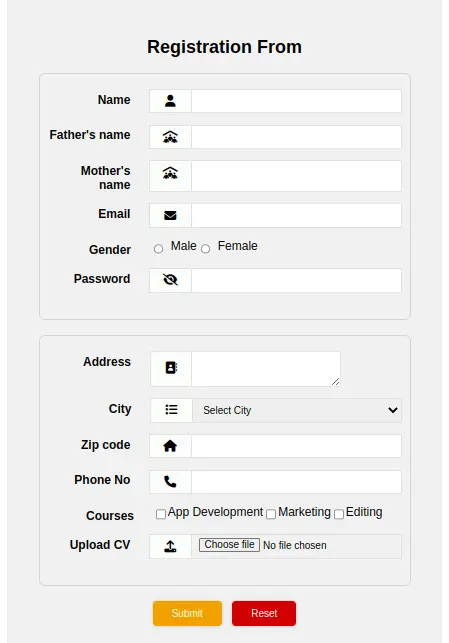
The student registration form contains inputs like name, date of birth, email, phone number, gender, password, academic details, courses, etc.
Our idea here is to wrap the student registration form in a <div> and give it a background image and make the form input element semi-transparent.
This will give our form a nice look and feel.
All the input elements will be inside <form> tag with a label and input.
For taking academic details, we will create an HTML table with input fields and insert it inside the form.
Student registration form complete code
<!DOCTYPE html>
<html>

<head>
  <title>Student Registration Form 1</title>
  <style>
    form {
      margin: auto;
      width: min(600px, 80%);
      padding: 20px;
      border: 1px solid #ddd;
      border-radius: 10px;
      background-image:
        url('https://images.unsplash.com/photo-1619279302118-43033660826a?ixlib=rb-4.0.3&ixid=MnwxMjA3fDB8MHxwaG90by1wYWdlfHx8fGVufDB8fHx8&auto=format&fit=crop&w=387&q=80');
      background-size: cover;
      background-position: center;
      background-repeat: no-repeat;

    }

    h2 {
      text-align: center;
      font-size: 28px;
      margin-bottom: 20px;
    }

    label {
      display: block;
      margin-bottom: 5px;
      font-weight: bold;
    }

    input[type="text"],
    input[type="email"],
    input[type="tel"],
    textarea,
    select,
    #dob {
      width: 100%;
      padding: 10px;
      margin-bottom: 20px;
      border: 1px solid #ddd;
      border-radius: 5px;
      box-sizing: border-box;
      opacity: 0.5;
    }

    textarea {
      height: 100px;
      resize: vertical;
    }

    .checkboxes {
      display: flex;
      justify-content: space-between;
      flex-wrap: wrap;
      margin: 20px 0;
      border: 1px solid #ddd;
      border-radius: 5px;
      padding: 10px;
    }

    .checkbox {
      display: flex;
      align-items: flex-start;
      margin-right: 20px;
    }

    .checkboxes label {
      margin-right: 20px;
    }

    table {
      width: 100%;
      margin-bottom: 20px;
      border-collapse: collapse;
    }

    table th,
    table td {
      padding: 10px;
      border: 1px solid #ddd;
      text-align: center;
      color: #fff;
      font-size: 18px;
    }

    .buttons {
      display: flex;
      justify-content: center;
    }

    .buttons button {
      background-color: #854d28;
      color: #fff;
      padding: 10px 20px;
      border: none;
      border-radius: 5px;
      width: 150px;
      font-size: 16px;
      cursor: pointer;
      margin-right: 10px;
    }

    .buttons button:hover {
      background-color: #6e4225;
    }
  </style>
</head>

<body>
  <form>
    <h2>Student Registration Form</h2>

    <label for="first-name">First Name:</label>
    <input type="text" id="first-name" name="first-name" required>

    <label for="last-name">Last Name:</label>
    <input type="text" id="last-name" name="last-name" required>

    <label for="dob">Date of Birth:</label>
    <input type="date" id="dob" name="dob" required>

    <label for="email">Email Address:</label>
    <input type="email" id="email" name="email" required>

    <label for="mobile">Mobile:</label>
    <input type="tel" id="mobile" name="mobile" required>

    <label for="gender">Gender:</label>
    <select id="gender" name="gender" required>
      <option value="">Select Gender</option>
      <option value="male">Male</option>
      <option value="female">Female</option>
      <option value="other">Other</option>
    </select>

    <label for="address">Address:</label>
    <textarea id="address" name="address" required></textarea>

    <label for="city">City:</label>
    <input type="text" id="city" name="city" required>

    <label for="pin-code">Pin Code:</label>
    <input type="text" id="pin-code" name="pin-code" required>

    <label for="state">State:</label>
    <input type="text" id="state" name="state" required>

    <label for="country">Country:</label>
    <input type="text" id="country" name="country" required>

    <label for="hobbies">Hobbies:</label>
    <div class="checkboxes">
      <div class="checkbox">
        <input type="checkbox" id="hobby1" name="hobby1" value="reading">
        <label for="hobby1">Reading</label>
      </div>
      <div class="checkbox">
        <input type="checkbox" id="hobby2" name="hobby2" value="playing">
        <label for="hobby2">Playing</label>
      </div>
      <div class="checkbox">
        <input type="checkbox" id="hobby3" name="hobby3" value="singing">
        <label for="hobby3">Singing</label>
      </div>
      <div class="checkbox">
        <input type="checkbox" id="hobby4" name="hobby4" value="dancing">
        <label for="hobby4">Dancing</label>
      </div>
    </div>

    <label for="qualification">Qualification:</label>
    <table>
      <tr>
        <th></th>
        <th>Board</th>
        <th>Percentage</th>
        <th>Year of Passing</th>
      </tr>
      <tr>
        <td>10th</td>
        <td><input type="text" name="10-board" required></td>
        <td><input type="text" name="10-percentage" required></td>
        <td><input type="text" name="10-year-of-passing" required></td>
      </tr>
      <tr>
        <td>12th</td>
        <td><input type="text" name="12-board" required></td>
        <td><input type="text" name="12-percentage" required></td>
        <td><input type="text" name="12-year-of-passing" required></td>
      </tr>
      <tr>
        <td>Graduation</td>
        <td><input type="text" name="grd-board" required></td>
        <td><input type="text" name="grd-percentage" required></td>
        <td><input type="text" name="grd-year-of-passing" required></td>
      </tr>
    </table>

    <div class="buttons">
      <button type="reset">Reset</button>
      <button type="submit">Submit</button>
    </div>
  </form>
</body>

</html>Here is what our first student registration form looks like:

2. Student Registration Form
A student registration form has lots and lots of information to be filled in. So, we will divide our form into different sections. We will use fieldset to divide our form into different sections.
Also in this registration form, form we will use icons to enhance the look of our form. We will use Font Awesome icons for this purpose.
Here is the complete code for our student registration form:
Student registration form complete code
<!DOCTYPE html>
<html>

<head>
  <title>Student Registration Form 2</title>
  <link rel="stylesheet" href="https://cdnjs.cloudflare.com/ajax/libs/font-awesome/6.2.1/css/all.css">
  <style>
    body {
      font-family: arial;
      transition: all 0.5s ease;
      -webkit-transition: all 0.5s ease;
    }

    .container {
      padding: 40px;
      width: 500px;
      margin: 20px auto;
      background-color: #f1f1f1;
    }

    .container h2 {
      text-align: center;
    }

    fieldset {
      border: 1px solid #d4d4d4;
      padding: 20px 10px;
      margin-bottom: 20px;
      border-radius: 8px;
    }

    .input-field {
      display: flex;
      margin-bottom: 15px;
    }

    label {
      margin-right: 25px;
      margin-top: 5px;
      width: 30%;
      text-align: right;
      font-weight: bold;
    }

    .icon {
      background: #fcfcfa;
      color: black;
      min-width: 40px;
      border: 2px solid #e2e2e2;
      border-right: none;
      text-align: center;
      padding: 7px;
    }

    .inputs {
      padding: 3px 10px;
      border: 2px solid #e2e2e2;
      width: 70%;
    }

    input [type="radio"] {
      margin-right: 8px;
    }

    .textarea {
      padding: 8px;
      border: 2px solid #e2e2e2;
    }

    .textarea-icon {
      padding-top: 14px;
    }

    .button {
      text-align: center;
    }

    .submit {
      color: white;
      background: #ee9a25;
      padding: 9px 25px;
      margin-right: 10px;
      border: none;
      border-radius: 5px;
      box-shadow: 0 0 5px #c9c9c9;
    }

    .submit:hover {
      background: #d1871e;
    }

    .reset {
      color: white;
      background: #c93232;
      padding: 9px 25px;
      border: none;
      border-radius: 5px;
      box-shadow: 0 0 5px #c9c9c9;
    }

    .reset:hover {
      background: #a32727;
    }

    .city {
      margin-left: -6px;
    }

    .gender {
      margin-left: -30px;
    }

    .courses {
      margin-left: -26px;
    }

    input[type="radio"] {
      margin-right: 10px;
    }

    .message {
      margin-left: -30px;
    }
  </style>
</head>

<body>
  <div class="container">
    <h2>Registration From</h2>
    <form action="">
      <fieldset>
        <div class="input-field">
          <label>Name</label>
          <i class="fa fa-user icon"></i>
          <input type="text" class="inputs" name="usrname">
        </div>
        <div class="input-field">
          <label>Father's name</label>
          <i class="fa-solid fa-people-roof icon"></i>
          <input type="text" class="inputs" name="usrname">
        </div>
        <div class="input-field">
          <label>Mother's name</label>
          <i class="fa-solid fa-people-roof icon"></i>
          <input type="text" class="inputs" name="usrname">
        </div>
        <div class="input-field">
          <label>Email</label>
          <i class="fa fa-envelope icon"></i>
          <input type="email" class="inputs">
        </div>
        <div class="input-field">
          <label class="gender">Gender</label>
          <input type="radio" name="gender" value="male">Male
          <input type="radio" name="gender" value="female"> Female
        </div>
        <div class="input-field">
          <label>Password</label>
          <i class="fa fa-eye-slash icon"></i>
          <input type="password" class="inputs">
        </div>
      </fieldset>

      <fieldset>
        <div class="input-field">
          <label class="message">Address</label>
          <i class="fa-solid fa-address-book icon textarea-icon"></i>
          <textarea class="textarea"></textarea>
        </div>
        <div class="input-field">
          <label class="city">City</label>
          <i class="fa fa-list icon"></i>
          <select name="city" id="" class="inputs">
            <option value="0">Select City</option>
            <option value="1">City 1</option>
            <option value="2">City 2</option>
            <option value="3">City 3</option>
            <option value="4">City 4</option>
            <option value="5">City 5</option>
          </select>
        </div>
        <div class="input-field">
          <label>Zip code</label>
          <i class="fa fa-home icon"></i>
          <input type="number" class="inputs">
        </div>
        <div class="input-field">
          <label>Phone No</label>
          <i class="fa fa-phone icon"></i>
          <input type="number" class="inputs">
        </div>
        <div class="input-field">
          <label class="courses">Courses</label>
          <input class="" type="checkbox" value="app-development">App Development
          <input class="" type="checkbox" value="marketing">Marketing
          <input class="" type="checkbox" value="editing">Editing
        </div>
        <div class="input-field">
          <label>Upload CV</label>
          <i class="fa fa-upload icon"></i>
          <input type="file" class="inputs">
        </div>
      </fieldset>

      <div class="button">
        <button type="submit" class="submit">Submit</button>
        <button type="reset" class="reset">Reset</button>
      </div>
    </form>
  </div>
</body>

</html>Here is what our second student registration form looks like:

Conclusion
So, this is how you can create a student registration form in HTML with CSS. You can also add more fields to this form as per your requirement.
We have seen 2 different forms of the student registration form in this tutorial, the first one with a background image and the second one with icons and a fieldset to group the fields.
Happy Coding! 😇
