Registration Form in HTML
Registration form is a form where a user fills in his details to register on a website. It is a very important form for a website as it helps in collecting user information like name, email, password, etc.
You may have filled many registration forms on websites like social media, e-commerce, ticket booking, paid subscription, etc.
Registration forms collects user infomrations, varifies them and stores them in a database. Later these details are used to send emails, notifications, etc.
In this article we will learn how to create a different types registration form in HTML.

1. Simple Registration Form in HTML
For a good start let's create a simple registration form in HTML that takes user name, email and password as input fields.
First create an HTML form with three input fields and a submit button.
Each input field should have a name attribute so that we can access the data entered by the user. Also create a label for each input field.
Here is the code for the registration form in HTML.
<form action="" method="post">
  <label for="name">Name:</label>
  <input type="text" id="name" name="name" placeholder="Your name.." required>

  <label for="email">Email:</label>
  <input type="email" id="email" name="email" placeholder="Your email.." required>

  <label for="password">Password:</label>
  <input type="password" id="password" name="password" placeholder="Your password.." required>

  <input type="submit" value="Register">
</form>
You can also add form heading and wrap the form in a div element.
Now we have to style the form using CSS. Here is the CSS code for the registration form in HTML.
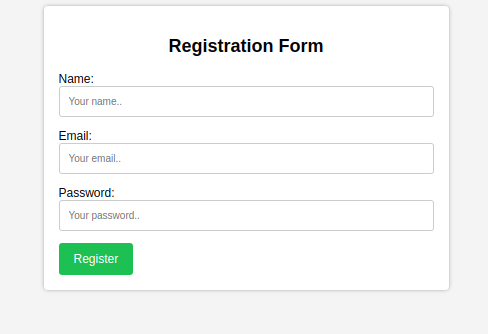
Simple registration form
body {
  font-family: Arial, sans-serif;
  background-color: #f4f4f4;
}

.container {
  max-width: 500px;
  margin: auto;
  padding: 20px;
  background-color: #fff;
  border-radius: 5px;
  box-shadow: 0 0 5px rgba(0, 0, 0, 0.3);
}

h2 {
  text-align: center;
  margin-bottom: 20px;
}

input[type="text"],
input[type="email"],
input[type="password"] {
  width: 100%;
  padding: 12px;
  border: 1px solid #ccc;
  border-radius: 4px;
  box-sizing: border-box;
  margin-bottom: 16px;
}

input[type="submit"] {
  background-color: #4CAF50;
  color: #fff;
  padding: 12px 20px;
  border: none;
  border-radius: 4px;
  cursor: pointer;
  font-size: 16px;
}

input[type="submit"]:hover {
  background-color: #45a049;
}Click on the Try it button to see the output of the registration form in HTML.
Output:
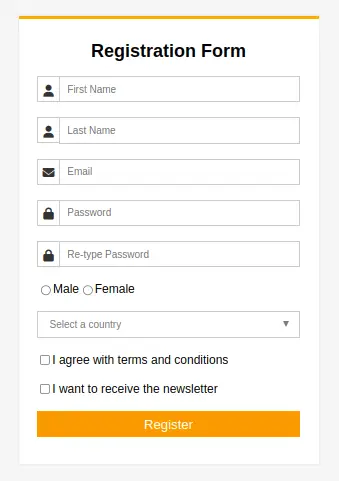
2. Registration Form with Icons
Adding icons to the input fields makes the registration form more attractive and user friendly.
Icons represents the purpose of the input field. For example, we can use a user icon for the name field, email icon for the email field and a lock icon for the password field.
To add icon to we first create a div element, inside it we create an icon element and an input field.
The icon will be on left side and input field will be next to it to properly convey the meaning of input.
<div class="input-field">
  <i class="fa fa-user"></i>
  <input type="text" name="name" placeholder="First Name" />
</div>
Here we are using font-awesome to generate icons.
Now style it to enhance it's beauty. You can use flexbox to keep your icon and input side by side.
Here is complete code for this registration form.
Registration form 2
<!DOCTYPE html>
<html>

<head>
  <meta charset="UTF-8">
  <title>Registration Form 2</title>
  <link rel="stylesheet" href="https://cdnjs.cloudflare.com/ajax/libs/font-awesome/6.4.0/css/all.min.css">
  <style>
    body {
      background: #f5f5f5;
      font-family: sans-serif;
    }

    .container {
      background: #fff;
      width: 400px;
      max-width: 100%;
      box-sizing: border-box;
      padding: 25px;
      margin: 20px auto;
      position: relative;
      z-index: 1;
      border-top: 5px solid #f5a81a;
      box-shadow: 0 0 3px rgba(0, 0, 0, 0.1);
    }

    h2 {
      font-size: 1.5em;
      line-height: 1.5em;
      margin: 0;
      text-align: center;
      padding-bottom: 15px;
    }

    .input-field {
      display: flex;
      margin-bottom: 20px;
    }

    .input-field i {
      color: #333;
      height: 22px;
      width: 30px;
      padding-top: 10px;
      border: 1px solid #cccccc;
      border-right: none;
      text-align: center;
    }

    .input-field input:hover {
      background: #fafafa;
    }

    .input-field input[type=text],
    .input-field input[type=email],
    .input-field input[type=password] {
      width: 100%;
      padding: 8px 10px;
      height: 35px;
      border: 1px solid #cccccc;
      box-sizing: border-box;
      outline: none;
    }

    .input-field input[type=text]:focus,
    .input-field input[type=email]:focus,
    .input-field input[type=password]:focus {
      box-shadow: 0 0 2px 1px rgba(255, 169, 0, 0.5);
      border: 1px solid #f5ba1a;
      background: #fafafa;
    }

    .select-option {
      position: relative;
      width: 100%;
    }

    .select-option select {
      display: inline-block;
      width: 100%;
      height: 35px;
      padding: 0px 15px;
      cursor: pointer;
      color: #7b7b7b;
      border: 1px solid #cccccc;
      border-radius: 0;
      background: #fff;
      appearance: none;
    }

    .select-arrow {
      position: absolute;
      top: calc(50% - 4px);
      right: 15px;
      width: 0;
      height: 0;
      pointer-events: none;
      border-width: 8px 5px 0 5px;
      border-style: solid;
      border-color: #7b7b7b transparent transparent transparent;
    }

    input[type=submit] {
      background: #f5961a;
      height: 35px;
      line-height: 35px;
      width: 100%;
      border: none;
      outline: none;
      cursor: pointer;
      color: #fff;
      font-size: 1.1em;
      margin-bottom: 10px;
    }

    input[type=submit]:hover {
      background: #d17f13;
    }
  </style>
</head>

<body>
  <div class="container">
    <h2>Registration Form</h2>
    <form action="" method="post">
      <div class="input-field">
        <i class="fa fa-user"></i>
        <input type="text" name="name" placeholder="First Name" />
      </div>
      <div class="input-field">
        <i class="fa fa-user"></i>
        <input type="text" name="name" placeholder="Last Name" required />
      </div>
      <div class="input-field">
        <i class="fa fa-envelope"></i>
        <input type="email" name="email" placeholder="Email" required />
      </div>
      <div class="input-field">
        <i class="fa fa-lock"></i>
        <input type="password" name="password" placeholder="Password" required />
      </div>
      <div class="input-field">
        <i class="fa fa-lock"></i>
        <input type="password" name="password" placeholder="Re-type Password" required />
      </div>

      <div class="input-field">
        <input type="radio" name="gender" id="male">
        <label for="male">Male</label>
        <input type="radio" name="gender" id="female">
        <label for="female">Female</label>
      </div>
      <div class="input-field select-option">
        <select>
          <option>Select a country</option>
          <option>Option 1</option>
          <option>Option 2</option>
        </select>
        <div class="select-arrow"></div>
      </div>
      <div class="input-field">
        <input type="checkbox" id="terms">
        <label for="terms">I agree with terms and conditions</label>
      </div>
      <div class="input-field">
        <input type="checkbox" id="newsletter">
        <label for="newsletter">I want to receive the newsletter</label>
      </div>
      <input class="button" type="submit" value="Register">
    </form>
  </div>
</body>

</html>Here is how this new registration form looks like:
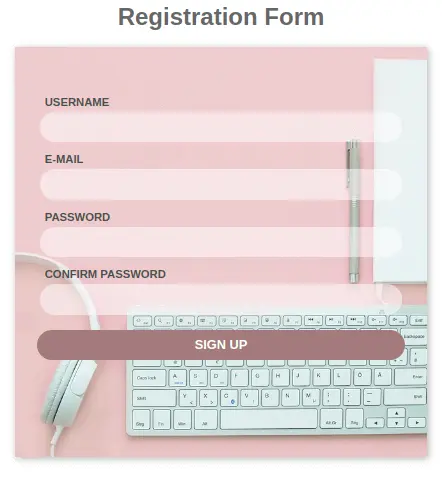
3. Registration Form with Image
Let's create another HTML registration from with image background.
Adding images to the background of form is a great way to spice up the design. Images can also be used to convey the purpose of the form.
In this form we create a <div> element with class="container" and add an image to it using the background-image property.
Now create your form inside this element with necessary input fields and submit button.
Here is complete HTML code for this form:
Registration form 2
<!DOCTYPE html>
<html>

<head>
  <meta charset="UTF-8">
  <title>Registration Form 3</title>
  <style>
    body {
      font-family: sans-serif;
    }

    h1 {
      text-align: center;
      color: #666;
    }

    .container {
      width: 550px;
      margin: 20px auto;
      padding-bottom: 80px;
      box-shadow: 2px 2px 10px #b4b4b4;
      background-image: url('https://cdn.pixabay.com/photo/2017/05/11/11/15/workplace-2303851_960_720.jpg');
      background-size: cover;
      background-position: center;
      background-repeat: no-repeat;
    }

    form {
      padding: 50px 30px;
    }

    label {
      display: block;
      margin-top: 10px;
      padding: 5px 10px;
      font-size: 15px;
      font-weight: 600;
      color: #4d4d4d;
    }

    input {
      display: block;
      width: 93%;
      margin: auto;
      padding: 13px;
      border: none;
      border-radius: 20px;
      background: #ffffff;
      opacity: 0.5;
    }

    input.submit {
      width: 100%;
      padding: 10px;
      margin-top: 20px;
      font-size: 17px;
      font-weight: 700;
      color: #ffffff;
      opacity: 1;
      background-color: #a07e80;
      cursor: pointer;
    }
  </style>
</head>

<body>
  <h1>Registration Form</h1>
  <div class="container">
    <form class="contact-form">
      <label for="name">USERNAME</label>
      <input type="text" id="name">

      <label for="email">E-MAIL</label>
      <input type="text" id="email">

      <label for="password">PASSWORD</label>
      <input type="text" id="password">

      <label for="confirm-passwprd">CONFIRM PASSWORD</label>
      <input type="text" id="confirm-password">

      <input class="submit" value="SIGN UP" type="submit">
    </form>
  </div>
</body>

</html>Here is how ouput of this registration from looks like:
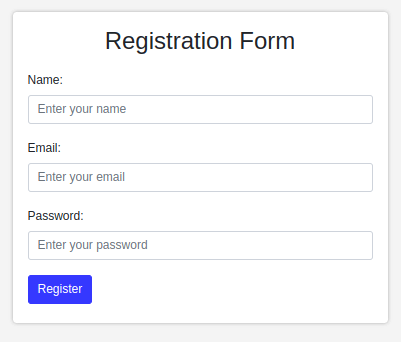
4. Registration Form using Bootstrap
Bootstrap is a popular CSS framework that comes with a lot of pre-built components.
Using Bootstrap we can create advance registration form with minimal effort.
Here is the complete HTML code for registration form using bootstrap:
Registration form 4
<!DOCTYPE html>
<html>

<head>
  <meta charset="UTF-8">
  <title>Registration Form 4</title>
  <link rel="stylesheet" href="https://maxcdn.bootstrapcdn.com/bootstrap/4.0.0/css/bootstrap.min.css">
  <style>
    body {
      background-color: #f4f4f4;
    }

    .form-container {
      max-width: 500px;
      margin: auto;
      padding: 20px;
      background-color: #fff;
      border-radius: 5px;
      box-shadow: 0 0 5px rgba(0, 0, 0, 0.3);
    }

    h2 {
      text-align: center;
      margin-bottom: 20px;
    }

    .form-group {
      margin-bottom: 20px;
    }

    .error {
      color: red;
      margin-top: 5px;
    }

    .success {
      color: green;
      margin-top: 5px;
    }
  </style>
</head>

<body>
  <div class="container mt-5">
    <div class="form-container">
      <h2>Registration Form</h2>
      <form action="" method="post">
        <div class="form-group">
          <label for="name">Name:</label>
          <input type="text" class="form-control" id="name" name="name" placeholder="Enter your name" required>
          <div class="error"></div>
        </div>
        <div class="form-group">
          <label for="email">Email:</label>
          <input type="email" class="form-control" id="email" name="email" placeholder="Enter your email" required>
          <div class="error"></div>
        </div>
        <div class="form-group">
          <label for="password">Password:</label>
          <input type="password" class="form-control" id="password" name="password" placeholder="Enter your password"
            required>
          <div class="error"></div>
        </div>
        <button type="submit" class="btn btn-primary">Register</button>
        <div class="success"></div>
      </form>
    </div>
  </div>
  <!-- Link to Bootstrap JS -->
  <script src="https://code.jquery.com/jquery-3.2.1.slim.min.js"></script>
  <script src="https://maxcdn.bootstrapcdn.com/bootstrap/4.0.0/js/bootstrap.min.js"></script>
  <!-- Custom JavaScript -->
  <script>
    // Form Validation
    $('form').submit(function (event) {
      // Prevent Form from Submitting
      event.preventDefault();
      // Clear Error and Success Messages
      $('.error').html('');
      $('.success').html('');
      // Get Form Data
      var formData = {
        'name': $('#name').val(),
        'email': $('#email').val(),
        'password': $('#password').val()
      };
      // Validate Form Data
      var errors = false;
      if (formData.name == '') {
        $('#name').next('.error').html('Please enter your name');
        errors = true;
      }
      if (formData.email == '') {
        $('#email').next('.error').html('Please enter your email');
        errors = true;
      }
      if (formData.password == '') {
        $('#password').next('.error').html('Please enter your password');
        errors = true;
      }
      // If there are no errors, submit the form
      // ...
    });
  </script>
</body>

</html>Here is how ouput of this registration from looks like:
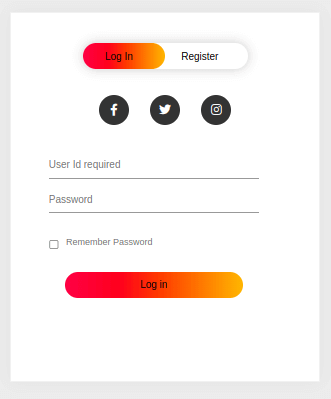
5. Registration Form with Login and Signup Tabs
You must have seen a registration form on many websites having two tabs, one for login and another for signup.
This type of forms has their own advantages. For example, if you are a new user, you can directly go to the signup tab and register yourself. If you are an existing user, you can directly go to the login tab and login to your account.
Multi-Tab Registration Form in HTML
<!DOCTYPE html>
<html lang="en">

<head>
  <meta charset="UTF-8">
  <title>Registration Form 5</title>
  <link rel="stylesheet" href="https://cdnjs.cloudflare.com/ajax/libs/font-awesome/6.4.0/css/all.min.css">
  <style>
    body {
      margin: 0;
      padding: 0;
      font-family: sans-serif;
      background-color: #ececec;
    }

    .container {
      width: 400px;
      height: 480px;
      position: relative;
      margin: 6% auto;
      background: #fff;
      padding: 5px;
      overflow: hidden;
      border: 1px solid #f1f1f1;
      box-shadow: 0 0 20px 0 #e4e4e4;
    }

    .tabs {
      width: 220px;
      margin: 35px auto;
      position: relative;
      box-shadow: 0 0 15px #cacaca;
      border-radius: 30px;
    }

    .toggle-btn {
      padding: 10px 30px;
      cursor: pointer;
      background: transparent;
      border: 0;
      outline: none;
      position: relative;
    }

    #btn {
      top: 0;
      left: 0;
      position: absolute;
      width: 110px;
      height: 100%;
      background: linear-gradient(to right, #ff105e, #ffad05);
      border-radius: 30px;
      transition: .5s;
    }

    .social-icons {
      margin: 30px auto;
      text-align: center;
    }

    .social-icons i{
      width: 40px;
      height: 40px;
      line-height: 40px;
      font-size: 16px;
      color: #fff;
      margin: 0 12px;
      background: #333;
      border-radius: 50%;
      transition: .5s;
    }

    .form {
      top: 180px;
      position: absolute;
      width: 280px;
      transition: .5s;
    }

    .input-filed {
      width: 100%;
      padding: 10px 0;
      margin: 5px 0;
      border-left: 0;
      border-top: 0;
      border-right: 0;
      border-bottom: 1px solid #999;
      outline: none;
      background: transparent;
    }

    .submit-btn {
      width: 85%;
      padding: 10px 30px;
      cursor: pointer;
      display: block;
      margin: auto;
      background: linear-gradient(to right, #ff105e, #ffad05);
      border: 0;
      outline: none;
      border-radius: 30px;
    }

    .check-box {
      margin: 30px 10px 30px 0;
    }

    span {
      color: #777;
      font-size: 12px;
      bottom: 68px;
      position: absolute;
    }

    #login {
      left: 50px;
    }

    #register {
      left: 450px;
    }
  </style>
</head>

<body>
  <div class="container">
    <div class="tabs">
      <div id="btn"></div>
      <button type="button" class="toggle-btn" onclick="login()">Log In</button>
      <button type="button" class="toggle-btn" onclick="registration()">Register</button>
    </div>
    <div class="social-icons">
      <i class="fab fa-facebook-f"></i>
      <i class="fab fa-twitter"></i>
      <i class="fab fa-instagram"></i>
    </div>

    <form id="login" class="form">
      <input type="text" class="input-filed" placeholder="User Id required">
      <input type="text" class="input-filed" placeholder="Password">
      <input type="checkbox" class="check-box"><span>Remember Password</span>
      <button type="submit" class="submit-btn">Log in</button>
    </form>

    <form id="register" class="form">
      <input type="text" class="input-filed" placeholder="User Id">
      <input type="email" class="input-filed" placeholder="Email Id">
      <input type="text" class="input-filed" placeholder="Password">
      <input type="checkbox" class="check-box"><span>I agree to the terms & conditions</span>
      <button type="submit" class="submit-btn">Register</button>
    </form>
  </div>

  <script>
    var logIn = document.getElementById("login");
    var register = document.getElementById("register");
    var button = document.getElementById("btn");

    function registration() {
      logIn.style.left = "-400px";
      register.style.left = "50px";
      button.style.left = "110px";
    }

    function login() {
      logIn.style.left = "50px";
      register.style.left = "450px";
      button.style.left = "0";
    }
  </script>
</body>

</html>Here is how ouput of this registration from looks like:
Conclusion
So, this is how you can create a registration form in HTML.
You have seen 5 different types of registration forms in HTML. You can use any of them as per your requirement.
Hope you liked this tutorial.
Happy Learning!