Display JSON Data in HTML Page
JSON (JavaScript Object Notation) is a popular data format used to store data in a structured way. Even data received from a server is in JSON.
JSON data has a structure like a Javascript object. Data is stored in key-value pairs, where the key is a string and the value can be any type of data.
In this article, we will explore multiple ways to display JSON data in HTML using JavaScript. So let's dive in and learn how to bring JSON to life on your web page! 🚀
- 💻 Directly Displaying JSON Data in HTML
- 📃 Displaying JSON Data as a List
- 🗂️ Displaying JSON Data in a Table
- 📝 Formatting and Displaying JSON Data
- 🌐 Fetching and Displaying JSON Data from an API
- Conclusion
Table of Contents

1. 💻 Directly Displaying JSON Data in HTML
JSON data can be directly displayed in HTML using <pre> tag. The <pre> tag is used to display preformatted text. It preserves both spaces and line breaks.
To display JSON data in HTML, we have to first convert it into a string using JSON.stringify() method and then display it using <pre> tag.
The following example shows how you can directly display JSON data in HTML using <pre> tag.
<pre id="json"></pre>

<script>
  const data = [
    { "name": "John", "age": 22 },
    { "name": "Smith", "age": 25 },
    { "name": "Jane", "age": 21 }
  ];

  // 👉 convert JSON data to string
  const dataString = JSON.stringify(data);

  // display data in pre tag
  document.getElementById("json").innerHTML = dataString;
</script>Output:
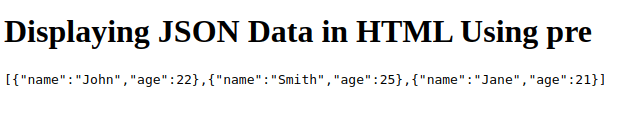
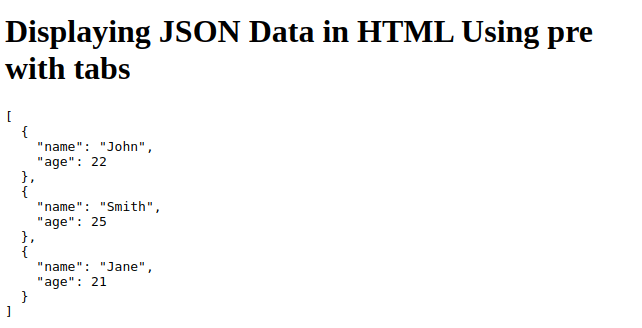
You can see in the above output that JSON data is displayed as a compressed string. To display it in a more readable format you can format the JSON data by adding tabs and line breaks using JSON.stringify() method.
Apply JSON.stringify(data, null, 2) to add 2 spaces before each value and JSON.stringify(data, null, 4) to add 4 spaces before each value.
Here is the complete code to display JSON data in HTML in a more readable format.
<pre id="json"></pre>

<script>
  const data = [
    { "name": "John", "age": 22 },
    { "name": "Smith", "age": 25 },
    { "name": "Jane", "age": 21 }
  ];

  // 👉 convert JSON data to string with tab size=2
  const dataString = JSON.stringify(data, null, 2);

  // display data in pre tag
  document.getElementById("json").innerHTML = dataString;
</script>Output:
2. 📃 Displaying JSON Data as a List
Displaying JSON with <pre> tag is not easy to read and understand. So displaying JSON data as a list is a better option.
To display the JSON data in a list we will create HTML elements dynamically and insert data in them.
The elements we need to create here are ul and li.
Here is our sample JSON data that we will display as a list.
{
  "result": [
    {
      "name": "John",
      "marks":{
        "math":"78",
        "english":"90",
        ...
      }
    },
    {
      "name": "Mike",
      "marks":{
        "math":"67",
        "english":"86",
        ...
      }
    },
    ...
  ]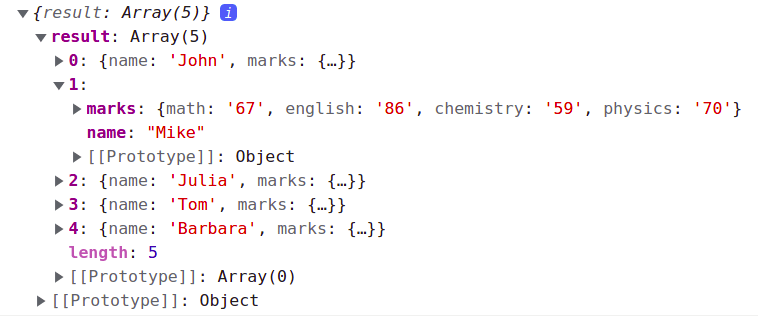
}Before we start keep the data structure of JSON data in mind. The image below shows to get the first student name we have to use data.result[0].name and to get first student marks we have to use data.result[0].marks, where to access marks of math subject we have to use data.result[0].marks.math.
Keeping the above structure in mind we first create a ul element and assign it to a variable.
const mainUL = document.createElement('ul')This ul element will be the main element any list element (li) will represent a student and their marks and will be created dynamically.
Now we can create a for loop that will iterate over the data.result array and create a li element for each student and sets the innerHTML of the li element to the student name.
for(let i = 0; i < data.result.length; i++) {
  const studentLI = document.createElement('li');
  studentLI.innerHTML = data.result[i].name;
}
Now create another list that will contain all the marks of the student and append it to the li element (studentLI) created just before.
for(let i = 0; i < data.result.length; i++) {
  const studentLI = document.createElement('li');
  studentLI.innerHTML = data.result[i].name;

  // create list for marks
  const marksUL = document.createElement('ul');
  for(var key in data.result[i].marks) {
    const marksLI = document.createElement('li');
    marksLI.innerHTML = key + ': ' + data.result[i].marks[key];
    marksUL.appendChild(marksLI);
  }

  // append marks list to studentLI
  studentLI.appendChild(marksUL);
}
Now we have created a list of students and their marks. Now we can append the ul element to the mainUL element.
// append studentLI to mainUL
mainUL.appendChild(studentLI);
Finally, append it to the body. Here is the complete code to display the list of students and their marks.
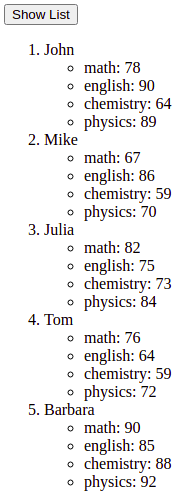
<button onclick="showList()">Show List</button>

<script>
  function showList(){
    fetch("./lib/examples/students.json")
      .then(response => response.json())
      .then(data => createList(data));
  }

  function createList(data) {
    const mainUL = document.createElement('ol');
    for (let i = 0; i < data.result.length; i++) {
      const studentLI = document.createElement('li');
      studentLI.innerHTML = data.result[i].name;

      // create list for marks
      const marksUL = document.createElement('ul');
      for (var key in data.result[i].marks) {
        const marksLI = document.createElement('li');
        marksLI.innerHTML = key + ': ' + data.result[i].marks[key];
        marksUL.appendChild(marksLI);
      }

      // append marks list to studentLI
      studentLI.appendChild(marksUL);
      // append student list to mainUL
      mainUL.appendChild(studentLI);
    }
    // append mainUL to body
    document.body.appendChild(mainUL);
  }
</script>Output:
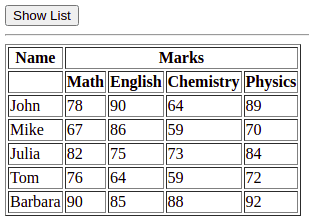
3. 🗂️ Displaying JSON Data in a Table
To display the JSON data in a table we will create a function that takes JSON data as an argument and creates a table and append it to the body.
In the function, createtable() create the basic structure of the table so that we have the heading of the table as 'name' and 'marks'. Below these marks create another list to show the subject as shown in the code below.
var table = "<table border=1>";
// add a row for name and marks
table += `<tr>
            <th>Name</th>
            <th colspan="4">Marks</th>
          </tr>`;
// now add another row to show subject
table += `<tr>
            <th></th>
            <th>Math</th>
            <th>English</th>
            <th>Chemistry</th>
            <th>Physics</th>
          </tr>`;
Now we can create a for loop that will iterate over the data.result array and create a tr element for each student and set innerHTML of the tr element to the student name.
// now loop through students
// show their name and marks
var tr = "";
for(let i = 0; i < data.result.length; i++) {
  tr += "<tr>";
  tr += `<td>${data.result[i].name}</td>`;
  for (var key in data.result[i].marks) {
    tr += `<td>${data.result[i].marks[key]}</td>`;
  }
  tr += "</tr>"
}
Finally, append the table to the body. Here is the complete Javascript code for fetching JSON data and displaying it as a table.
function showTable(){
  fetch("./lib/examples/students.json")
    .then(response => response.json())
    .then(data => createTable(data));
}

function createTable(data) {
var table = "<table border=1>";
// add a row for name and marks
table += `<tr>
            <th>Name</th>
            <th colspan="4">Marks</th>
          </tr>`;
// now add another row to show subject
table += `<tr>
            <th></th>
            <th>Math</th>
            <th>English</th>
            <th>Chemistry</th>
            <th>Physics</th>
          </tr>`;
// now loop through students
// show their name and marks
var tr = "";
for(let i = 0; i < data.result.length; i++) {
  tr += "<tr>";
  tr += `<td>${data.result[i].name}</td>`;
  for (var key in data.result[i].marks) {
    tr += `<td>${data.result[i].marks[key]}</td>`;
  }
  tr += "</tr>"
}
table += tr + "</table>";

  // append table to body
  document.body.innerHTML += table;
}Output:
4. 📝 Format and Show JSON Data in HTML
If you want to format the JSON data and display it with custom styling, you can create HTML elements dynamically using JavaScript.
For styling we are using a basic JSON structure that contains a name, age, and city of a student. The key will be displayed in bold and the value will be displayed in normal text.
const data = {
  "name": "John",
  "age": 22,
  "city": "New York"
};

const mainDiv = document.createElement('div');
for (var key in data) {
  const keyDiv = document.createElement('div');
  // 👉 formatting JSON data
  keyDiv.innerHTML = `<b>${key}</b>: ${data[key]}`;
  mainDiv.appendChild(keyDiv);
}
document.body.appendChild(mainDiv);Output:

5. 🌐 Fetching and Displaying JSON Data from an API
Fetching JSON data from an API is similar to fetching JSON data from a file. The only difference is that we have to provide the URL of the API instead of the file path.
Here is the code to fetch JSON data from an API and display it as a list.
function showList(){
  fetch("./students.json")
    .then(response => response.json())
    .then(data => createList(data));

  function createList(data) {
    // your code here
  }

}Conclusion
In this article, we explored various methods to display JSON data in HTML using JavaScript. We learned how to directly display JSON data, format and customize its representation, display it in a table format, and fetch JSON data from an API.
Happy coding! 🚀✨